Tag: mulching

Challenging Common Rose Planting Advice

At the risk of seeming foolish, I’m going to court controversy, and attempt to debunk a piece of gardening advice so commonplace that it’s taken as gospel truth. It goes like this:

When planting a rose, dig a much larger hole than the pot size, and then amend the soil heavily before back-filling around the new plant.

I’ve seen different versions of this. Some say a hole 2 times as wide as the original pot. Some say wider. As to depth, many articles advise to dig just the depth of the pot (which makes sense to me), but others say to dig 18″ or 24″ no matter the pot size. In any case, there are any number of recommendations about how to amend the soil: bone meal, kelp meal, compost, well-rotted manure, alfalfa pellets, granular fertilizer, chelated iron, bagged potting mix, feather meal, and maybe even the kitchen sink!

I disagree with nearly all of this, and I’ll tell you why – first in this video, then in written detail below:

To recap my reasoning:

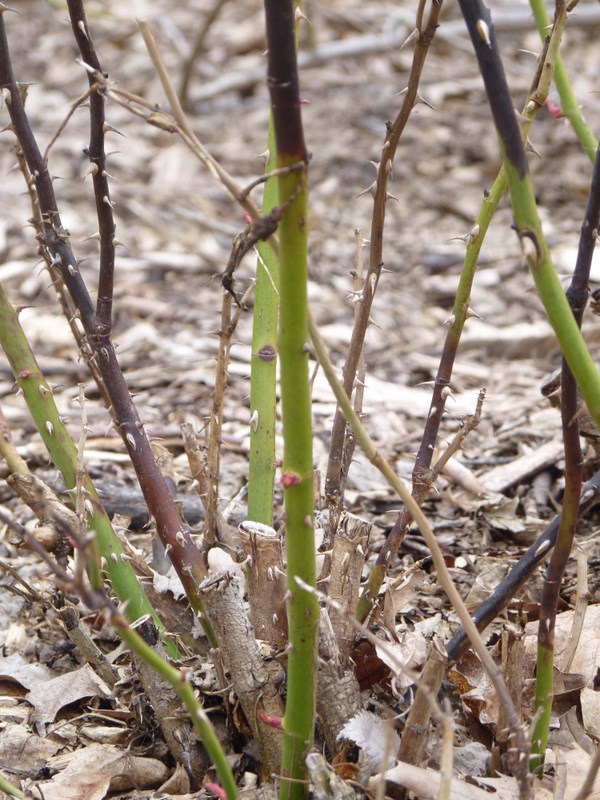
  1. The very most important thing to establishing a newly planted rose is to encourage the roots to grow outwards and downwards into the surrounding soil.
  2. The roots being firmly anchored down into the undisturbed native soil becomes really important over the winter, when the shrub is subjected to the additional weight of snow/ice and force of winter winds.
  3. The “boundary” between your improved soil and the surrounding unimproved soil becomes a barrier for roots and the natural drainage of water. Just common sense: if the soil inside your planting hole is so much richer, wouldn’t the plant favor root growth there instead of anchoring to the surrounding soil?
  4. I’ve learned it’s safer to err on the side of less fertility when establishing new plants – both here on my farm, and in my job as a grower. This isn’t a drag race… you don’t need to pump in the nitrous oxide!
  5. Back to stability: all those organic components mixed into the soil will eventually break down, leaving a pocket of less dense soil in the improved planting area.
  6. All of the soil improvement you could hope to achieve by the big hole method can be more safely and evenly applied by subsequently feeding your soil from the top down. Topdress with those organic amendments, add a mulch to the surface, and let the worms and soil life do the rest. They’re really good at the soil-improvement business!

Plus, less digging. Nuff said.

Avoid These 3 Things To Help Your Roses Survive Winter

Roses are built to survive winter

Don’t treat your roses like they’re the fancy dinnerware of the garden. Most are descended from tough, northern climate species, and they’re well prepared to get through the cold of fall and winter – at least in the mild-to-moderate climate of the Fraser Valley. Some of the “special care” that gardeners offer their roses in the lead-up to winter can, in fact, be detrimental to their survival. Don’t kill your roses with kindness! Avoid these 3 mistakes to give your roses a fair chance to survive:

#1: Late season pruning

Lock those pruners and back away from the rose… slowly. It may be tempting to give your roses a good cleanup going into the fall and winter. The leaves are yellowing and falling, the flowers are spent, and the stems are untidy – if not downright overgrown. You might think that your rose has a better chance if you cut it down lower, and send it into the winter with clean stems. You’d be wrong. Let me say this unambiguously – before winter is the wrong time to do structural pruning on a rose.

Why? Look at what winter damage on a rose looks like:

The stems are blackened at the top end – the most exposed tissue to the cold and drying winds of winter. The length of cane damaged will depend on the hardiness of the rose (many varieties have some sub-tropical genes bred in to promote reblooming) and the severity of the winter. In a mild winter, it may be only a couple of inches – in a severe winter, I’ve seen the damage exceed 18 inches!

Now I ask you: if you left your rose unpruned at 3 to 4 feet of height, and you lost 18 inches of stem in a severe winter, how would you feel about it? Not bad, probably. You were going to prune for shape and structure in the spring anyhow. Now how about if you pruned it back low  before winter – say to 18″ from the ground? If the winter damage reaches all the way back to the crown, it’s game over.

As an added advantage to leaving your rose a little untidy over the winter, birds and other wildlife depend on the rose hips and canes for food and protection.

I will add an exception now, just for completeness: there’s no bad time to remove dead or diseased wood from the rose. Also, if there are a few stems that have grown well above any support, and you know that they’ll just blow around and break in the wind, go ahead and prune them back to a reasonable length.

#2: Late season fertilizing

This one is a little counter-intuitive. It seems like a good idea to supply your plants with all the nutrition they need before the harshness of winter. A late-summer or fall application of fertilizer, however, can send your rose the wrong signal.

Those sub-tropical semi-evergreen rose genes I mentioned in passing come back into play here. Some of the best reblooming roses have a tendency to push new growth late in the season. They’re opportunistic growers. If the weather suits them, they’ll keep growing. As of today, November 19th, I still see a dozen or so roses in my garden cheerily flowering and sending up new growth.

In addition to mild weather, they’ll also grow in response to ample feeding and to heavy pruning.

That soft growth has no chance of hardening-off before winter. By far, you’re better off leaving the fertilizer until spring. Here on the rose farm, I stop feeding my outdoor roses in August.

#3: Deep Winter Mulch

The practice of hilling soil or mulch over the crown of a rose is a carryover from advice given to gardeners in very cold winter regions when trying to overwinter roses that are not well suited for their climate. It doesn’t apply well here, and from what I’ve read, it should be applied with caution even in colder climates. Read this article from the University of Illinois Extension for a good description of these methods. The emphasis is on not trapping moisture at the crown of the rose.

I don’t winter mulch anything. We take -10 celsius with heavy outflow winds, and my losses have been minimal. I’m crossing fingers and knocking wood as I write this, but I’m also quite sure that in our wet climate, anything that could hold water against the crown of my roses is not worth the risk.


For those who are more visual learners, here’s a video I made on the topics discussed above:

Overwintering roses in the Fraser Valley

If you grow roses in BC’s lower mainland, overall you’re pretty fortunate in your climate. Maybe not quite so fortunate as a rose grower in the highlands of Ecuador, but definitely lucky in comparison to a rose grower in Flin Flon, Manitoba. We benefit from a mild maritime climate, four (usually) distinct seasons, and we’re far enough north that our spring and summer days are extended – extra time to enjoy our gardens when they’re at their best! Take that, Ecuador!

As mild a climate as we Lower Mainlanders usually enjoy, we need to be aware of the occasional arctic outflow wind. These weather events are the most dangerous time of year for roses in your garden. Here’s a meteorological definition. If you work outdoors in the winter weather, you’ll notice when the wind begins coming in the wrong direction, from the east instead of the west or south. There’s a particular chill to that wind that will tell you something ugly is on the way.

Some of these arctic outflow storms can be vicious, in a relative way, of course. We’re accustomed to gentler weather conditions here. Maybe someone from Edmonton would scoff at this kind of storm, although I dare say that at the worst of times, when the arctic wind is whipping snow and ice sideways across the Matsqui and Sumas flats, even our brave Edmontonian would rather be inside.

They may happen only a few times a year, there are a few problems these arctic outflow events pose for our roses.

  1. They can come unexpectedly, any time in the winter or even late fall, before our garden plants have really decided to take winter seriously. If your roses haven’t “hardened off” for the cold season, they’re more susceptible to damage.
  2. Low humidity. Cold air holds less moisture than warm air, and wind sucks moisture out of plant tissues faster than still air. The result is that rose canes, especially younger longer shoots, will become dessicated by the wind. This is what causes those blackened shoots when the spring comes.
  3. In addition to sucking moisture faster, the winds also mean that any snow cover that would have been moderating the soil temperature is probably blowing right past the neighbor’s house. Times like this, a little bit of tree cover as a wind break is much appreciated.

I mentioned that roses need to “harden off” if they’re to avoid winter damage. For roses grown outdoors, you don’t have much control over this, except that you probably chose the roses in the first place, and some do a better job of it than others. I went out to the garden today (Nov 20, 2012) to see how the roses are doing. We’ve had a mild fall, and as expected, there are a few roses that are pushing it a bit, still putting up succulent new growth rather than going dormant.

In many roses, bright red stems and leaves mean new growth. ‘Anisley Dickson’ here is also throwing several new flower buds. It’s a bit of an issue with the repeat blooming genes that breeders select for… the rose will continue to put on new growth to support flowering, even when those flowers are unlikely to finish. For roses that don’t know when to quit blooming, an outflow wind can be devastating. The only control you have is to choose your roses varieties carefully.

‘Veilchenblau’ is a tough rambler rose. Even if it takes some damage through winter, it’ll put on a good show next year. In this picture, you can almost feel how soft this wood is. This is an example of a rose that’s so vigorous, it can go ahead and risk continued growth because it’s strong enough to thrive even if winter knocks it on its butt. What I’d rather see:

This is ‘Emily Grey’, a whichuraiana climber. This rose is in an exposed position along the back fence of our farm, and it looks like it takes the threat of winter seriously. Remember I wrote earlier that the color red in rose stems can indicate new, soft growth. That’s not the case here – this rose variety has wood that matures to this handsome mahogany color. Notice the buds are tight at each node, and ‘Emily Grey’ has even dropped it’s leaves.

Not all roses will drop leaves before the winter. Here’s one that has fully hardened, but is still holding onto its foliage:

You’ll have to take my word on it that the stem this specimen of ‘Complicata’ is completely hardened off. I show this to emphasize that the leaves don’t need to drop for a rose to be ready. The firmness (maturity) of the wood is what counts. Don’t be tempted to strip the leaves from your roses. It’s not only unnecessary, but probably does more harm than good by depriving the rose of the chance to finish the season in an orderly manner. When the leaves drop naturally, the attachment point is protected. Human hands pulling off leaves may cause injury, and give disease organisms a nice opportunity to get in.

So what do you have control over?

  • Your choice of roses. Hybrid teas are some of the tenderest varieties, and many gardeners in the rest of Canada don’t even attempt them. Look up the rose’s profile on helpmefind.com and look for the climate zone of hardiness. Most of the lower mainland is comfortably in zone 7 or 8, but you may want to choose a rose that’s good to zone 5 or 6 if you have an exposed site.
  • Location within the garden. You’ll have trees, shrubs, fences, hedges and buildings to take into account when you choose a spot for your roses. Remember that the worst of the outflow winds will be coming from the east, so place your tenderest roses to the west of something that can dampen the wind. I haven’t mentioned a whole lot about moisture in this posting, but if you’re choosing a site for a rose anyhow, be mindful of where there’s decent drainage. Even a hardy rose won’t stand a chance if it’s sitting in a puddle all winter.
  • Pruning and fertilizing. I tend to do most of my rose pruning in the early spring, when I can take out any canes that have been damaged by the winter. I keep on pruning most of the summer, shaping and tidying whenever I’m walking by a rose and have the pruners in my hand. Somewhere around August I ease off. It’s best to give this year’s growth some time to harden off. If you cut back too hard late in the season, the rose will likely respond by sending up more soft shoots. Likewise with fertilizer. A well-fed rose wants to grow and bloom, so I cut off the food supply in august as well.
  • Mulching. I put a 3 or 4 inch layer of oak leaves ( I just happen to have a fairly large oak tree on the driveway) at the base of my roses. It moderates the soil temperature. In the spring it can be chopped and worked into the soil to add organic matter. Most any loose mulch will do. I’ve seen recommendations for tender roses to build a wire mesh cage around the entire plant and cover with a foot of mulch. It might work, too, but my initial thought is that if you need to go this far, you’ve chosen the wrong rose.
  • Protect your containerized roses. It’s just a matter of choosing the best location you have available, and making it work. My cold frame greenhouse works pretty well, but not everyone has a greenhouse. A friend of mine (who has many more roses than I do) overwinters his container and tree roses in his garage, and it works beautifully. Do you have a back deck with some shelter from the wind? Can you collect them together under an outdoor stairway, or in the corner of the yard where they’ll get protection from the hedge on two sides? If you keep them outside where there will be wind, keep them bunched together so that they’ll provide some protection for each other. If you do find an indoor/greenhouse space, just be cautious about watering. Wait until the pot is relatively light and dry before watering fully. They’re not going through much water when they’re (semi) dormant, so don’t drown them.

All right. We’ve done what we can. Fingers crossed everyone?

Don’t stress. Roses are a lot tougher than they look.